

Do not index
Do not index
Using BotGhosts Custom Command Builder you can create some amazing commands to help streamline any task in your server. In this guide I will show you how to create an amazing Discord Ticket System using the BotGhosts Custom Command Builder. By the end of this guide your Discord Server will have an amazing Ticket Bot custom made by you!
Tools Needed
- BotGhost Custom Command Builder
- Support Team Roles
Creating the command
To start we will need to create a command that can be executed to send the ticket panel to a channel of your choosing, bare in mind this is the panel users will use to open up a support ticket so it must be a public channel.
Head into the command builder module located: https://dashboard.botghost.com/dashboard/customcommands and create a new command.
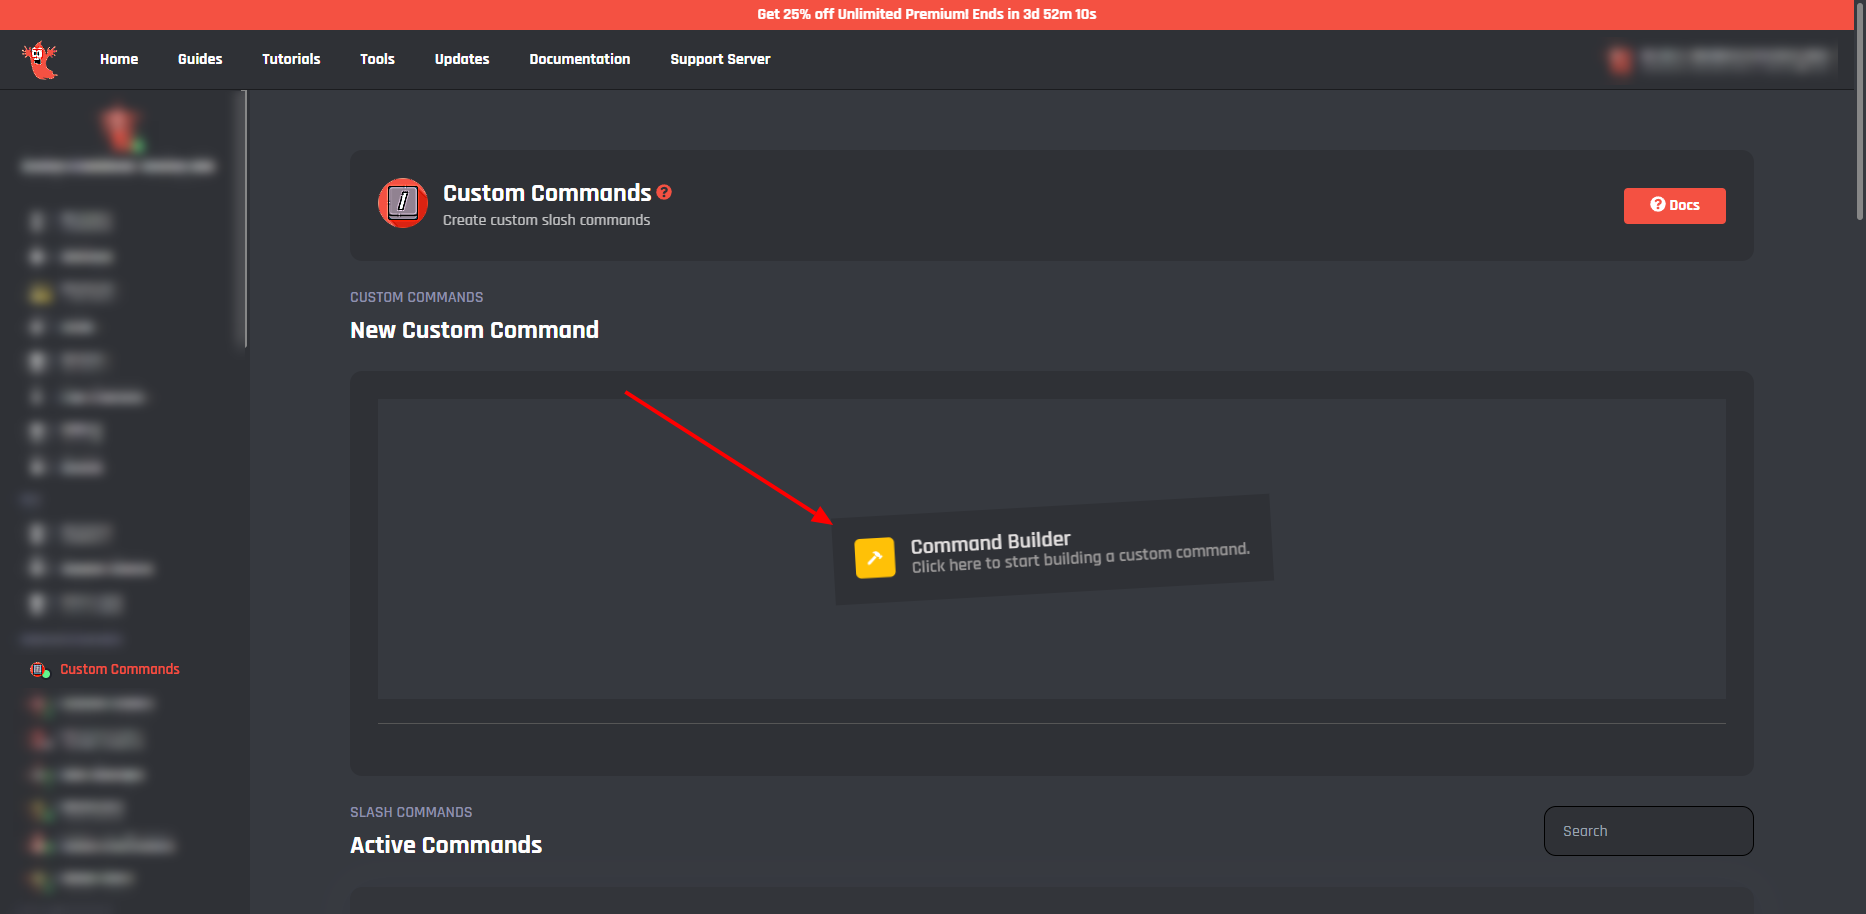
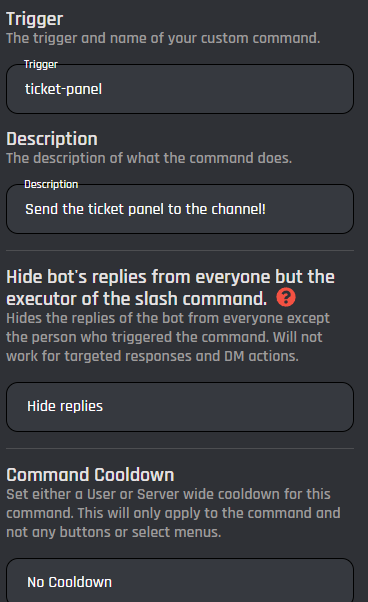
Once in the command builder we need to set up our trigger and description as well as other basic settings for the command.
Trigger: ticket-panel
Description: Send the ticket panel to the channel!
Hide the bots replies from everyone but the executor of the slash command: Hide replies
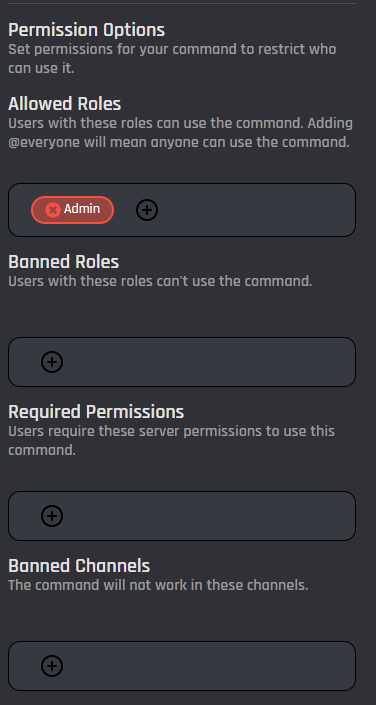
Allowed Roles: (add your admin role here and remove the @everyone role)
Basic command functions
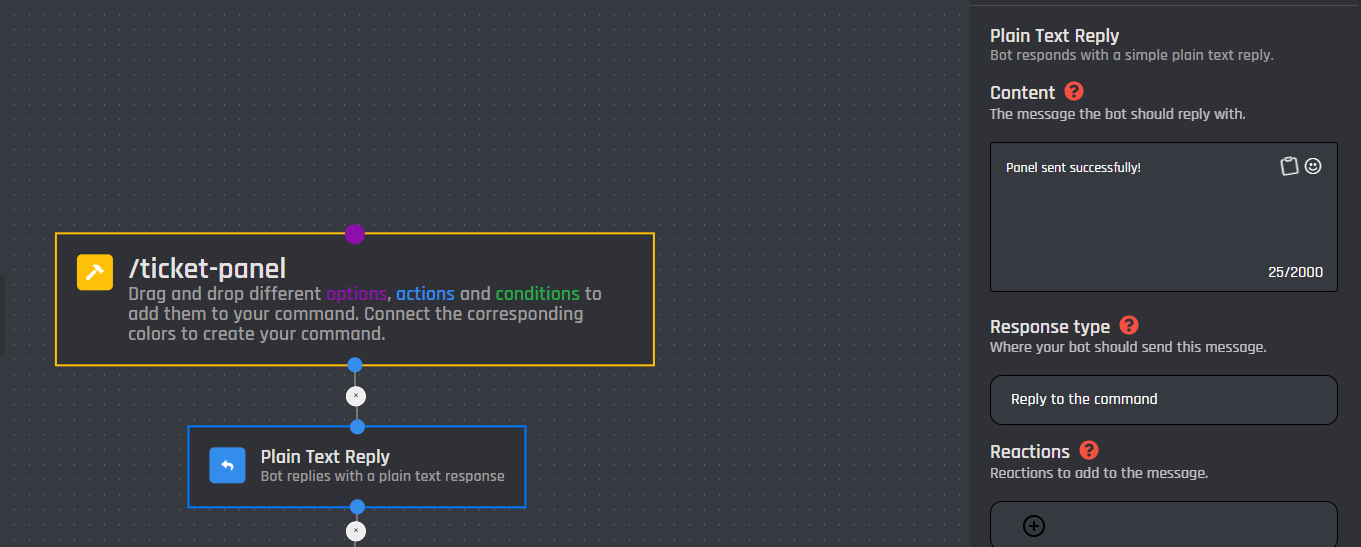
To stop the bot from endlessly thinking when we run the command, we need to add a plain text reply below the main command block, this is highlighted in yellow.
Inside the plain text reply this will be our confirmation message that the panel has been sent, simply put: “Panel sent successfully!”
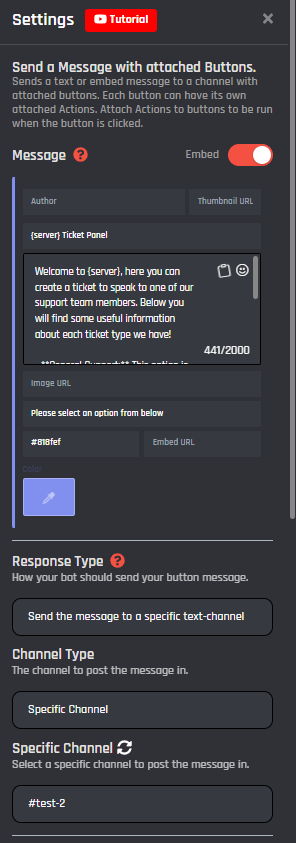
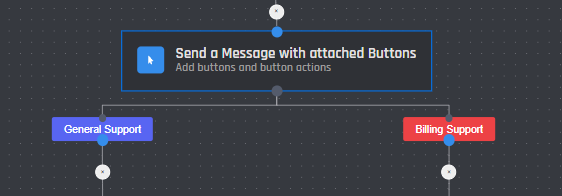
Next, below the plain text reply we will add our ticket panel, this will be used by any user who wants to open a support ticket, note I will only be adding 2 ticket types but you can as many as you want. Simply, add a ‘Send a message with attached buttons’ block below the plain text reply with these settings:
Embed: True
Title: {server} Ticket Panel
Body:
Welcome to {server}, here you can create a ticket to speak to one of our support team members. Below you will find some useful information about each ticket type we have!
**General Support:** This option is for users who wish to speak to a member of our support team for general issues or questions.
**Billing Support:** This option is for users who wish to speak to a member of our billing team for payment related enquiries or support.
Footer: Please select an option from below
Embed Color: #818fef
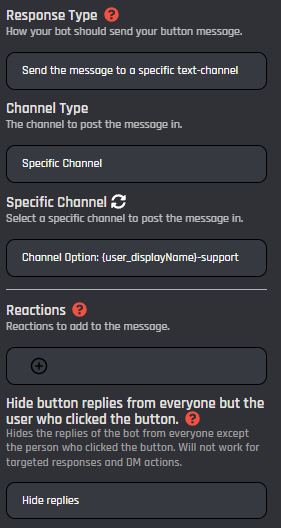
Response Type: Send a message to a specific text-channel
Specific Channel: (your ticket panel channel)
Hide Replies: Hide Replies
Buttons: 2
Button 1 Text: General Support
Button 1 Color: Blue
Button 1 Emoji: (optional)
Button 2 Text: Billing Support
Button 2 Color: Red
Button 2 Emoji: (optional)
You can customise the block to your liking however, for this guide this is how I will be creating it.
Creating the ticket channel
Now we need to create the ticket channel, but before we do that we need to collect some information from the user who is opening the ticket. To do this we can add a ‘Send a form’ block below each button like such:

Name each form block respectively, I've named my General Support one “General” and my Billing Support one “Billing”. Inside our form blocks we will add 2 input sections like such:
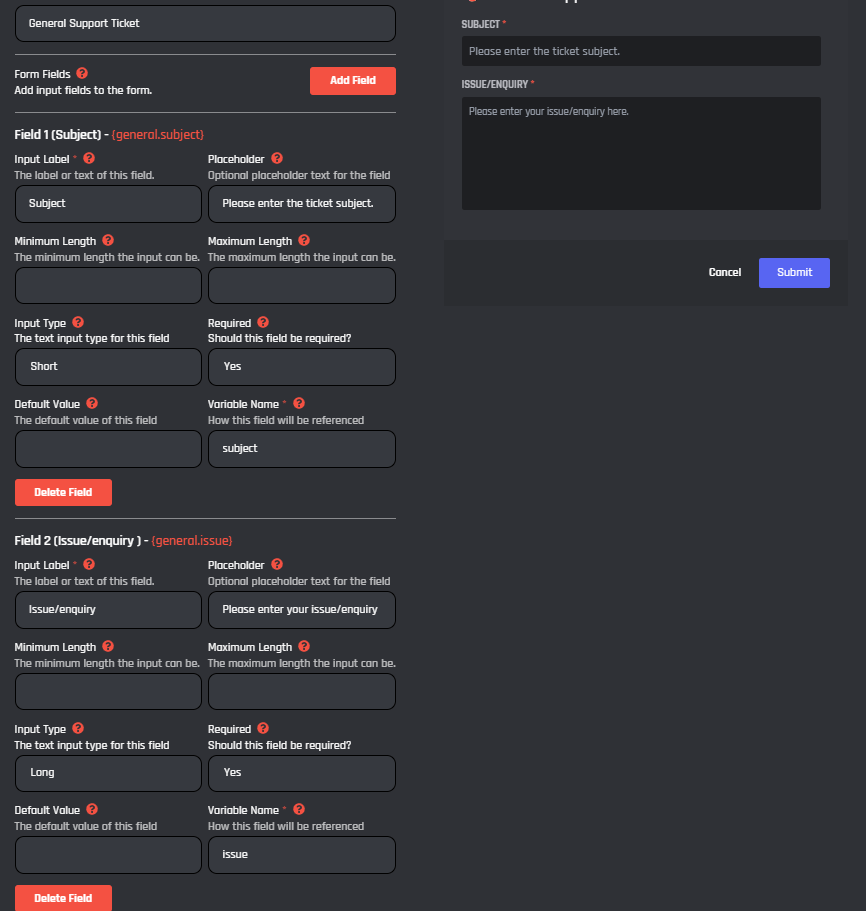
I will go over only one form block as both will be the exact same just different titles.
Title: General Support Ticket
Input Label: Subject
Placeholder: Please enter the ticket subject.
Input Type: Short
Required: Yes
Variable Name: subject
Make sure to add a second field with the following settings:
Input Label: Issue/enquiry
Placeholder: Please enter your issue/enquiry here.
Input Type: Long
Required: Yes
Variable Name: issue
Now we have the form to collect info from the user, we can add the create a channel block and connect it to the form.
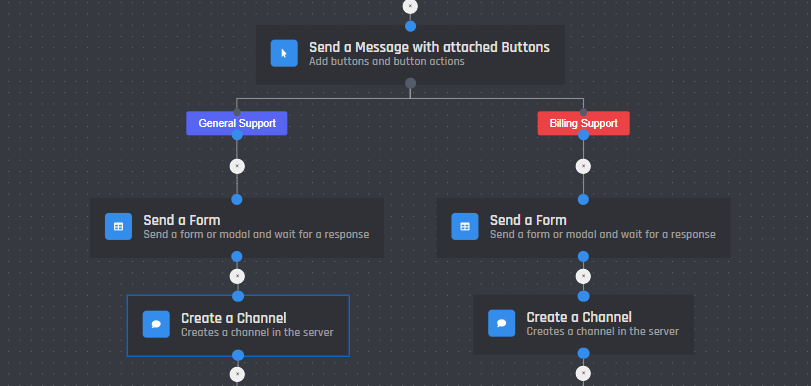
For our create a channel block we will add the following settings:
Name: {user_displayName}-support (remember to change ‘support’ to ‘billing’ for the billing options)
Type: Text channel
Permissions:
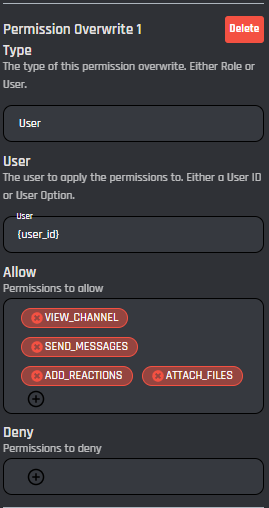
Permission Overwrite 1
Type: User
User: {user_id}
Allow: VIEW_CHANNEL, SEND_MESSAGES, ADD_REACTIONS, ATTATCH_FILES
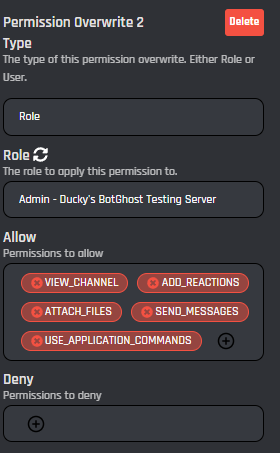
Permission Overwrite 2
Type: Role
Role: (your support team role)
Allow: VIEW_CHANNEL, SEND_MESSAGES, ADD_REACTIONS, ATTATCH_FILES
Permission Overwrite 3
Type: Role
Role: @everyone
Deny: VIEW_CHANNEL
You can add more permissions as needed, make sure to do the same for the other create channel blocks too.
Next we can add a plain text reply block with the following body:
Body:
Your ticket has been created and can be found here: {option_created_channel_xyz}
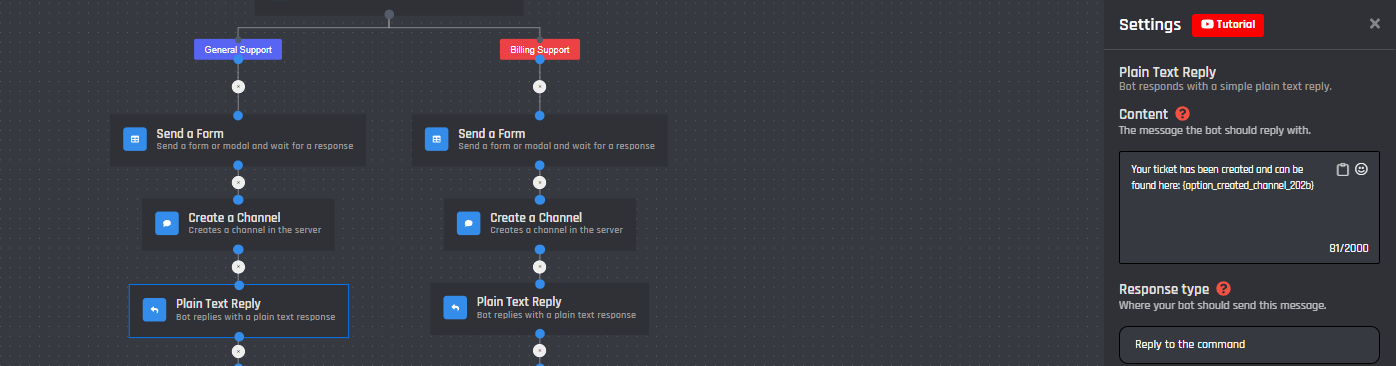
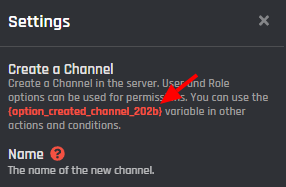
To get the correct value of ‘xyz’ you can refer to the create a channel block, all of them will be the same variable so you only need to check one of them. As shown below:
Ticket Content & Close Button
Now we can add the content to be sent to the ticket channel, to do this, add a ‘Send message with attached buttons’ below the plain text replies with the following settings:
Embed: True
Title: {user_displayName}-Support Tool Panel
Body:
Welcome to your ticket {user}! Please be patient, one of our support staff members will be with you soon!
## Subject
{general.subject}
### Issue/Enquiry
{general.issue}
Embed Color: #818fef
Response Type: Send a message to a specific text-channel
Specific Channel: Channel Option: {user_displayName}-support
Hide Replies: Hide Replies
Buttons: 1
Button 1 Text: Close
Button 1 Color: Red
Button 1 Emoji: (optional)
Closing The Ticket
To close the ticket we can add the following below the buttons (note, all buttons can have the same close sequence):
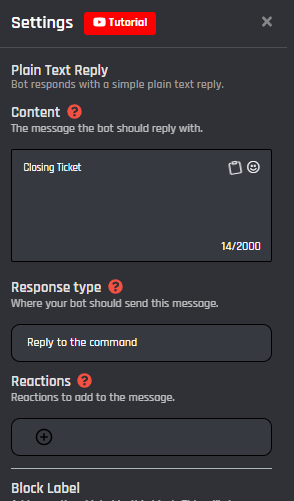
Plain Text Reply
This will stop the bot from thinking as well as confirm the close:
Body: Closing Ticket
Response Type: Reply to the command
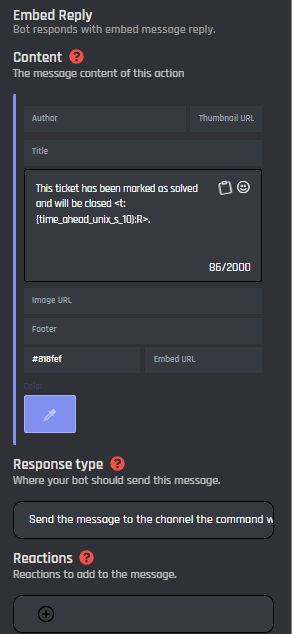
Embed Reply
The embed message will be sent to the channel to inform the user the ticket is closing:
Title:
Body: This ticket has been marked as solved and will be closed <t:{time_ahead_unix_s_10}:R>.
Color: #818fef
Response Type: Send the message to the channel the command was used in
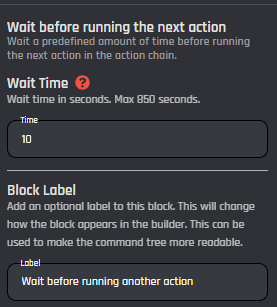
Wait Before Running The Next Action
This will delay the close for 10 seconds
Time: 10
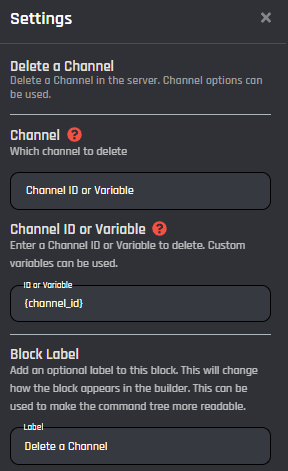
Delete A Channel
This will delete the ticket the button has been pressed in, it will not delete other channels outside of the ticket.
Channel: Channel ID or Variable
Channel ID or Variable: {channel_id}
Conclusion
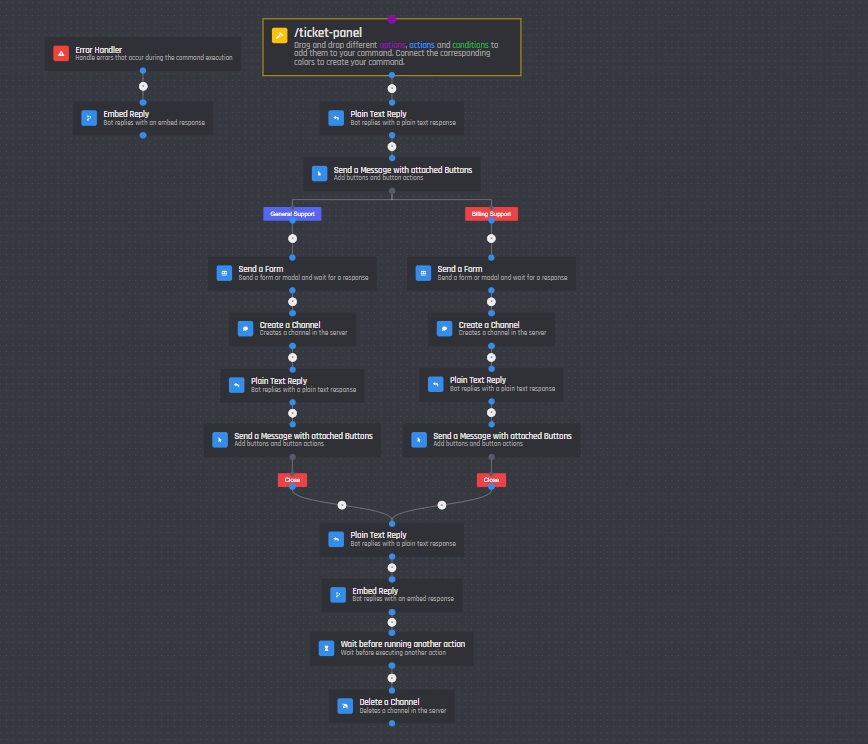
With these settings and blocks, you will now have a fully functional ticket system for your Discord server using BotGhost. Give yourself a pat on the back, make sure to compare your command to the one below, if yours is different, it may be a good idea to have another read through to make sure you did not miss anything:
Make sure to keep an eye out for the next guide which will cover some neat tools to add to this ticket system, from add and remove members, to claiming tickets. Your Discord support system will thank you!
If you need additional help setting up this ticket system, you can join our Discord support server at https://discord.gg/botghost. A member of our support team will be more than happy to assist you!
Written by


