

Do not index
Creating a ticket tools bot for Discord can be incredibly useful when you have a ticket system. Adding things like /add, /remove and claim features to a ticket channel is super handy to organise your in-server support system. In this guide I will walk you through how to create a /add, /remove and claim command.
Tools Needed
- Custom Command Builder
- Basic Knowledge of APIs
- BotGhost Data Storage
- Pre-Built Ticket System
/Add Command
To create a /add command we first need to modify our ticket system to save the ticket openers ID to the channel. To do this we will need to create a new channel specific data variable. Follow the process below.
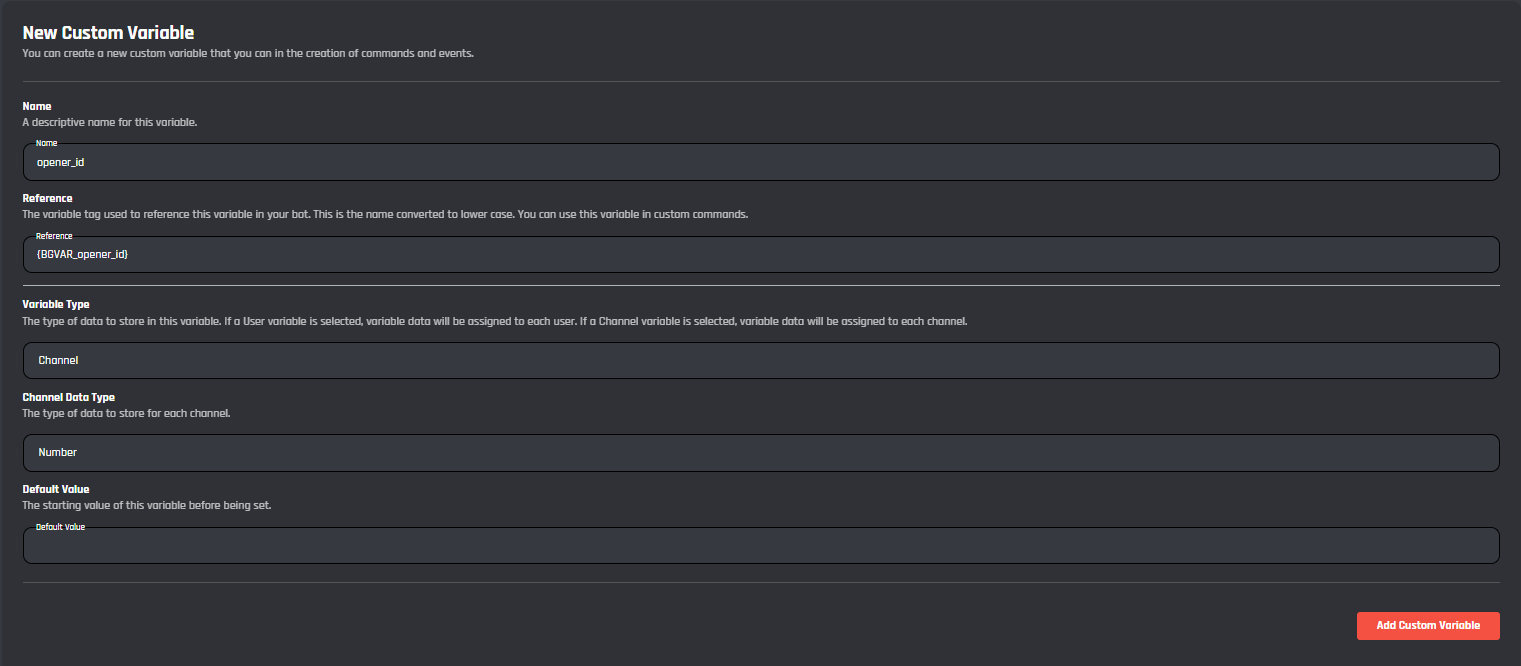
Data Variable
Head to the BotGhost data storage module and create a new data variable with these settings;
Name: opener_id
Variable Type: Channel
Channel Data Type: Number
Default Value: (leave blank)
Modifying Ticket System
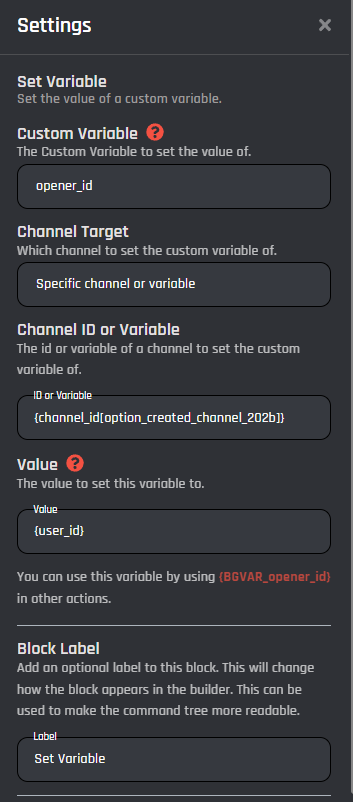
Now we need to implement this data variable into our previously created ticket system, if you do not have one already you can follow this guide. Simply locate the ‘Create a Channel’ blocks and add a ‘Set Variable’ block below them with these settings;
Custom Variable: opener_id
Channel Target: Specific channel or variable
Channel ID or Variable: {channel_id[option_created_channel_xyz]}
Value: {user_id}
Make sure to do this for all of the different ticket categories you have.
Creating The /add Command
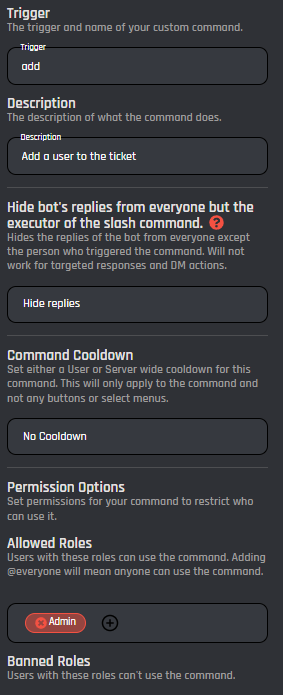
Now we have the openers ID saved, we can create a new command and name it ‘add’ like such:
Trigger: add
Description: Add a user to the ticket
Hide bot's replies from everyone but the executor of the slash command: Hide replies
Allowed Roles: (your support staff roles)
Next let's add a ‘User Option’ block to the command, this can be found in the actions menu in the options tab.
Name: user
Description: Select the user to add to the ticket.
Required: True
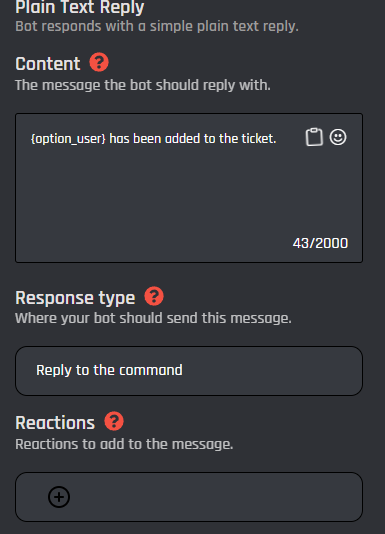
Next we will add a Plain Text Reply block:
Body: {option_user} has been added to the ticket.
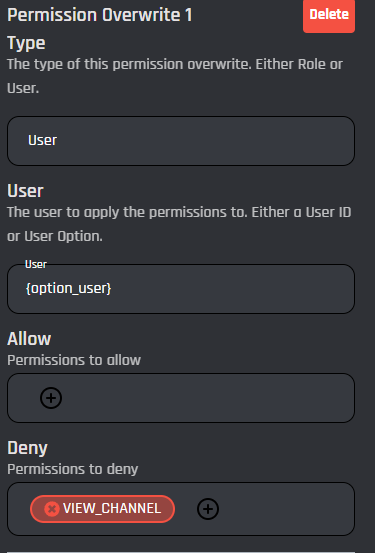
Below this add a ‘Edit Channel’ block with these settings:
Channel: Channel the command was run in
Permissions
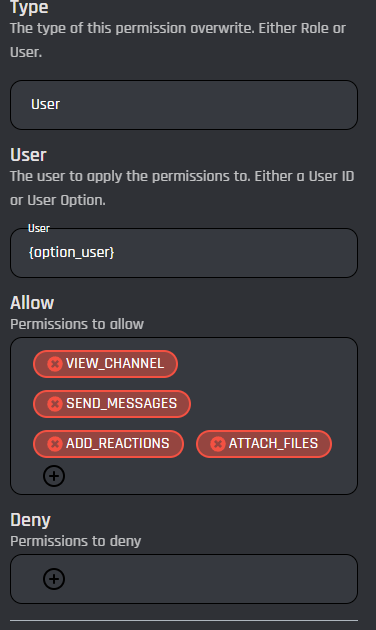
Permission Overwrite 1
Type: User
User: {option_user}
Allow: VIEW_CHANNEL, SEND_MESSAGES, ADD_REACTIONS, ATTATCH_FILES
Permission Overwrite 2
Type: Role
User: (your support staff role)
Allow: VIEW_CHANNEL, SEND_MESSAGES, ADD_REACTIONS, ATTATCH_FILES
Permission Overwrite 3
Type: User
User: {BGVAR_opener_id}
Allow: VIEW_CHANNEL, SEND_MESSAGES, ADD_REACTIONS, ATTATCH_FILES
Permission Overwrite 3
Type: Role
Role: @everyone
Deny: VIEW_CHANNEL
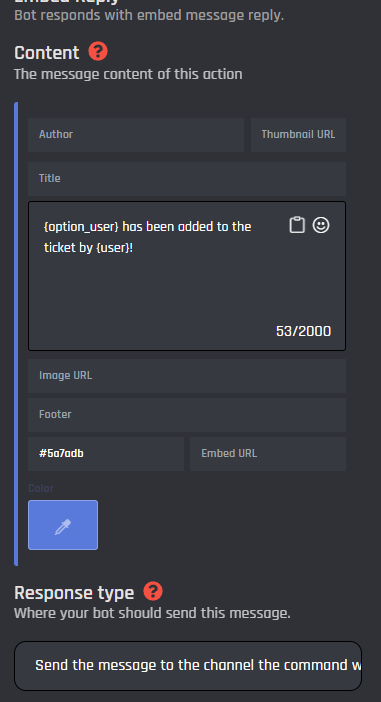
Finally, add an ‘Embed Reply’ block with these settings.
Title: N/A
Body: {option_user} has been added to the ticket by {user}!
Footer: N/A
Color: #5a7adb
Response Type:
Send a message to the channel the command was run in
Your command should look like this if all is done correctly:

With these in place, we have now made a simple /add command, we can do the same for the /remove command just change the response and permissions up a bit!
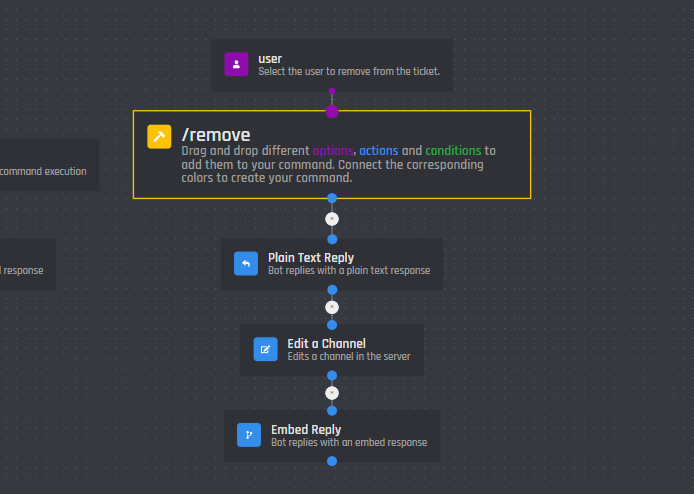
/Remove Command
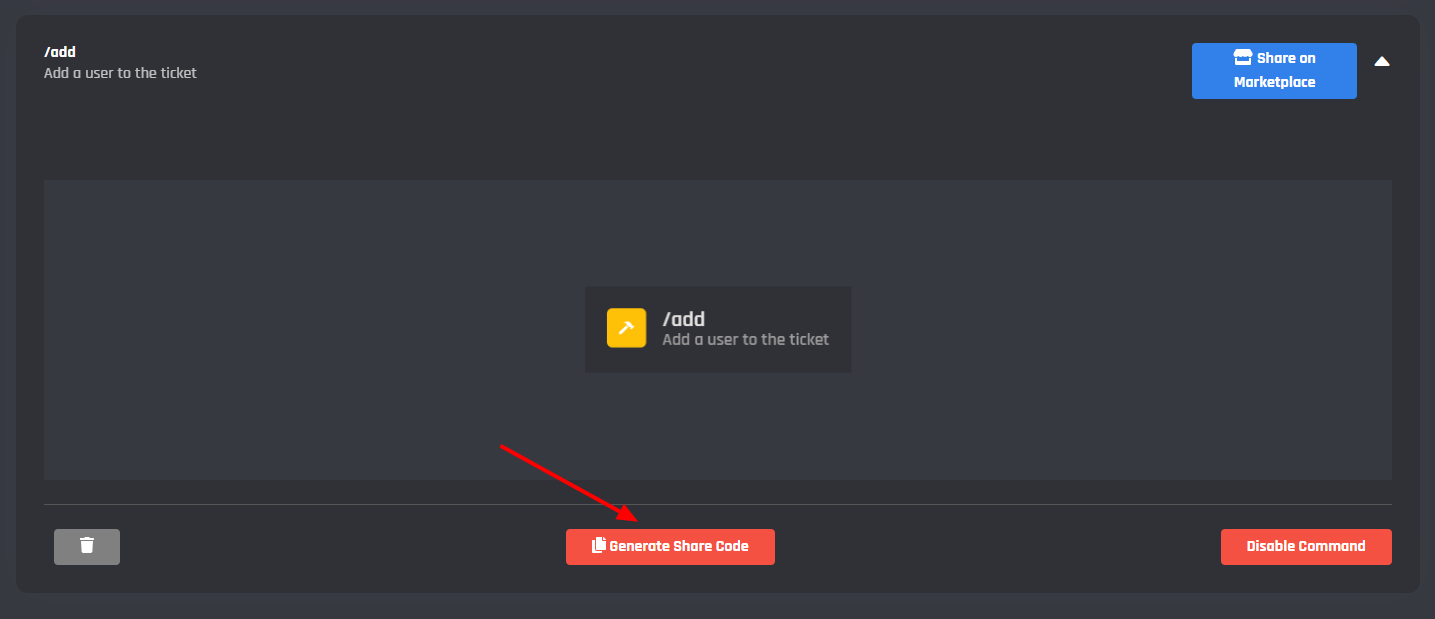
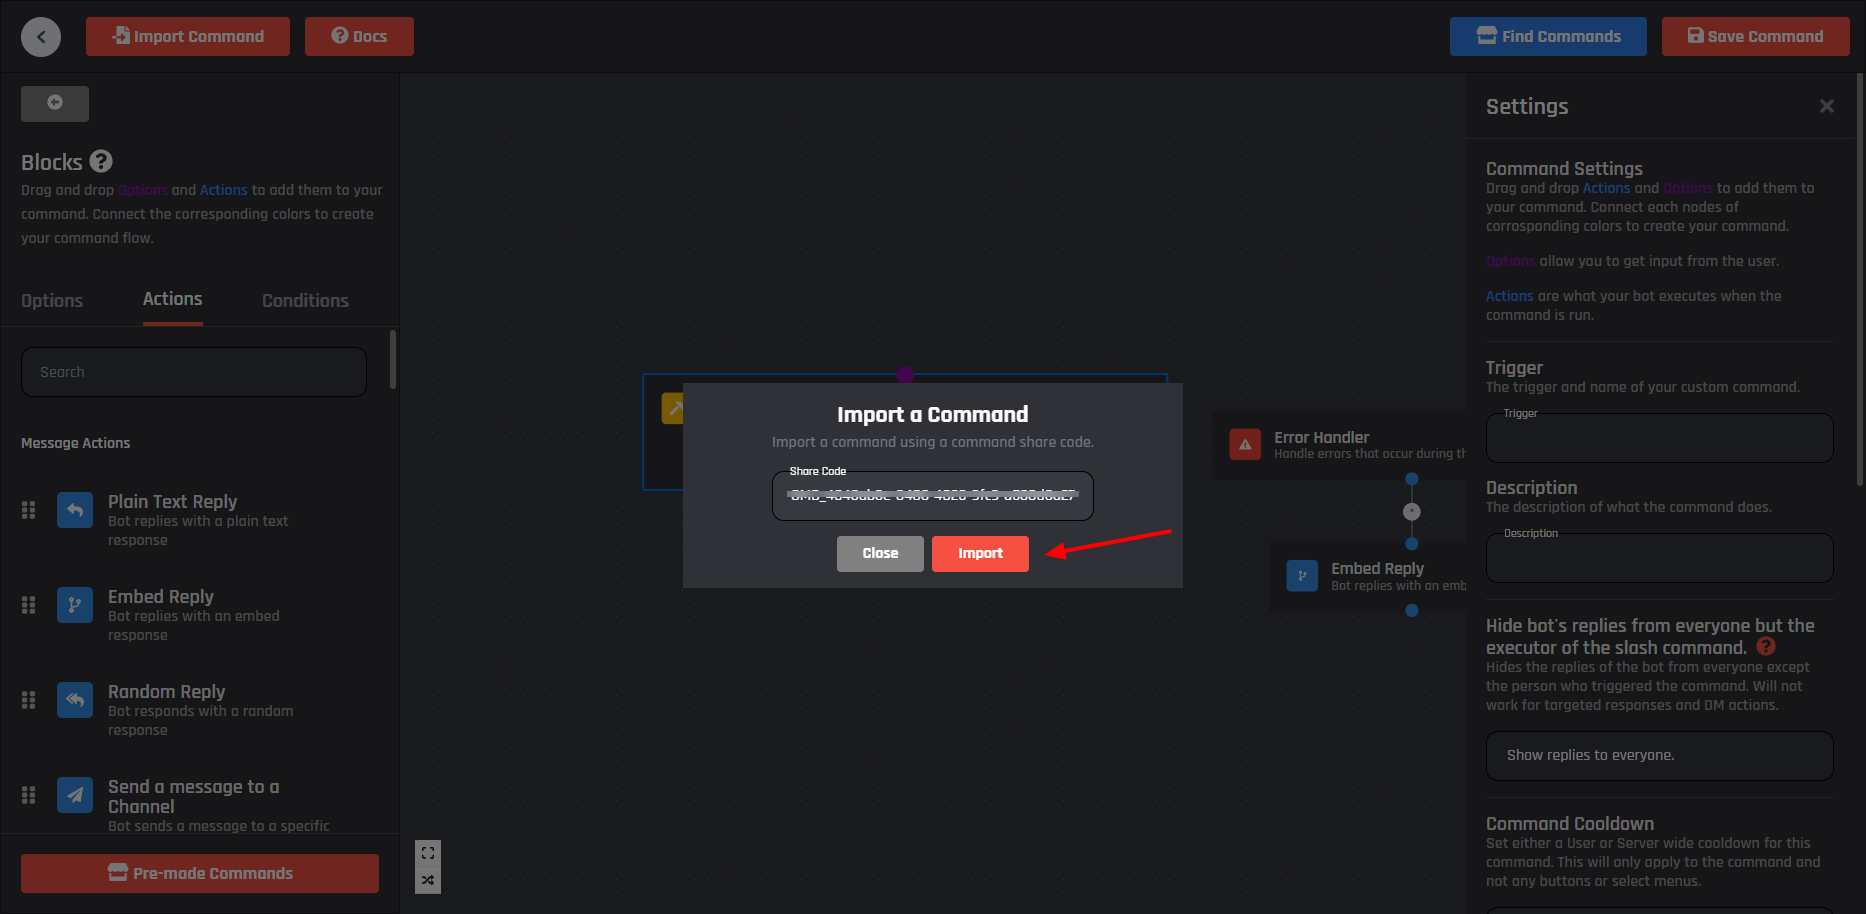
To create the /remove command we can duplicate the /add command and change some of the permissions and responses in it. To do this, navigate to the custom command builder, find your created /add command and follow these steps:
Step 1. Press your command

Step 2. Press ‘Generate Share Code’
Step 3. Hit save & press ‘Copy Share Code
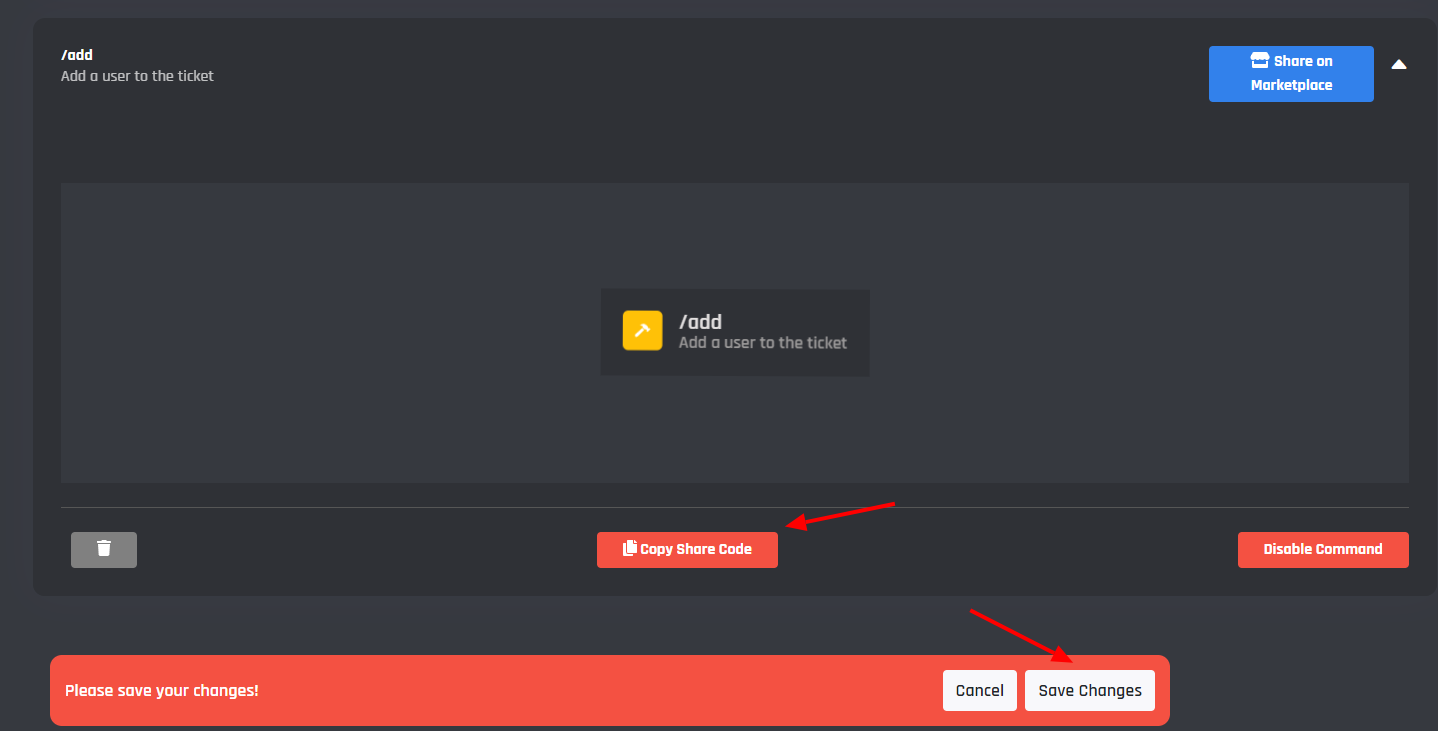
Step 4. Create a new command & press the ‘Import Command’ button
Step 5. Paste the command share code and hit ‘Import’
From here the command will be imported, simply change the main settings to the following:
Trigger: remove
Description: Remove a user from the current ticket
Now we can change the option description to “Select the user to remove from the ticket.”
Once done we need to change the reply blocks to the following:
Plain Text Reply: {option_user} has been removed from the ticket.
Embed Reply: {option_user} has been removed from the ticket by {user}!
Next, lets edit the ‘Edit Channel’ block permissions, we simply need to remove the ‘Allow’ permissions from {option_user} and add VIEW_CHANNEL to the ‘Deny’ section like such:
And now you also have a /remove command ready to go! Next let's do the claim function, this will require us heading back into the main ticket system command we added the ‘Set Variable’ block to previously.
Claim Ticket System
To add the claim system to the tickets, we need to create a new data variable, exactly the same as last time, just a different name. Like such:
Name: claimer_id
Variable Type: Channel
Channel Data Type: Number
Default Value: (leave blank)
Once created, head into the ticket system command and follow these steps:
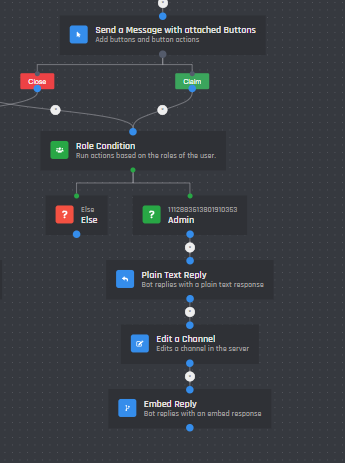
Step 1. Locate your button message that allows users to close the ticket and add a new button to it.
Step 3. Name the button ‘Claim’ and set it to green, next, add a role condition and attach it to the new claim button.
Step 4. Add your staff team's role to the condition and press ‘Add Condition’.
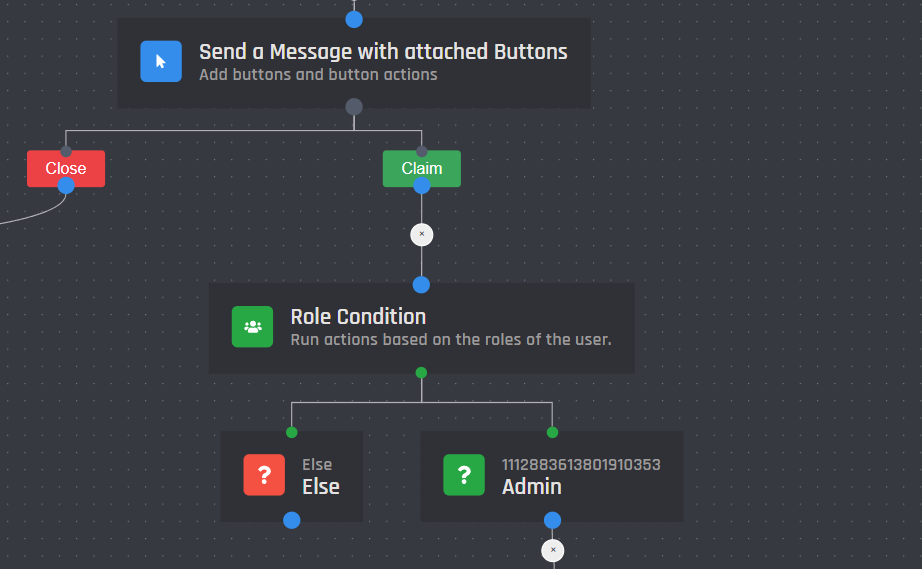
Step 5. Add a plain text reply block below the staff's role condition with the body as: “Ticket Claimed”
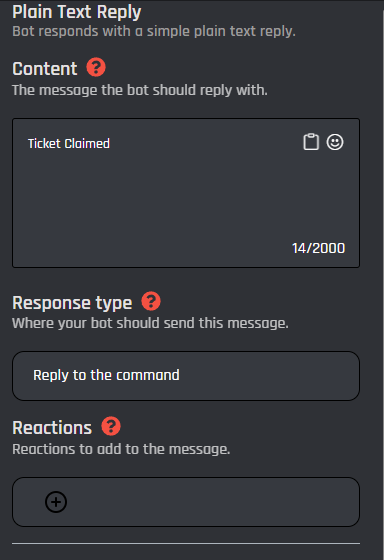
Step 6. Add a new edit channel block with the following settings:
Permission Overwrite 1
Type: User
User: {user_id}
Allow: VIEW_CHANNEL, SEND_MESSAGES, ADD_REACTIONS, ATTATCH_FILES
Permission Overwrite 2
Type: Role
User: (your support staff role)
Deny: VIEW_CHANNEL
Permission Overwrite 3
Type: User
User: {BGVAR_opener_id}
Allow: VIEW_CHANNEL, SEND_MESSAGES, ADD_REACTIONS, ATTATCH_FILES
Permission Overwrite 3
Type: Role
Role: @everyone
Deny: VIEW_CHANNEL

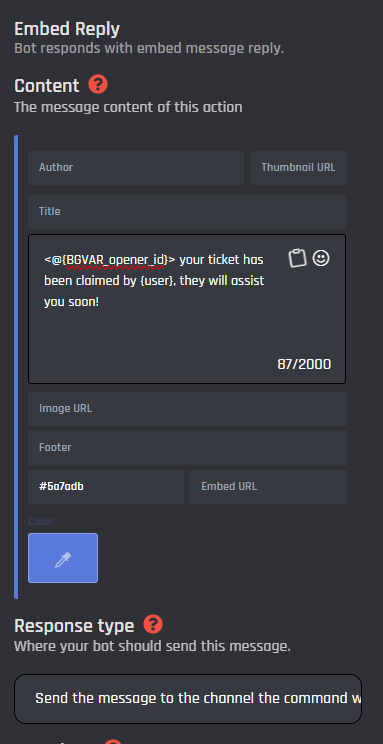
Step 7. Add a embed reply block with the following settings:
Title: N/A
Body: <@{BGVAR_opener_id}> your ticket has been claimed by {user}, they will assist you soon!
Footer: N/A
Color: #5a7adb
Response Type: Send a message to the channel the command was run in
Conclusion
And just like that, you now have some cool tools your support staff can use to add & remove users from tickets as well as claim tickets!
Check the images below to make sure your systems look the same as mine, if not, make sure to check the guide again in case you missed anything.
/Add Command

/Remove Command
Claim Ticket System
As always, if you need support make sure to join our Discord support server here: https://discord.gg/botghost. and a member of our support team will be more than happy to assist you with whatever issues you may be facing!
Written by

