
Table of Contents
- Getting Started
- Finished Result
- Who is OpenAI and what is GPT3?
- Signing up for OpenAI and generating an API key
- What is an API or Authorization key?
- Generating your OpenAI API Key
- Configuring our OpenAI completion API request
- Setting our Authorization Header
- Setting the URL
- Setting our Request Body
- Testing our request
- Creating our prompt in the Open AI playground
- Using our detailed prompt in our command
- Changing our prompt and using our user's question
- Displaying our answer to the user
![How to Make an AI GPT3 Question and Answer Bot on Discord using BotGhost & OpenAI [API Guide #2]](https://api-prod.usenotioncms.com/v1/proxy-2/block/dfb0dbb0-234d-4ef7-a2c2-7e1376d1c376%2F5d25f6a0-29ed-438c-a790-cb29c284e51c%2FUntitled1_13.png)
Do not index
This guide will go through the process of creating an AI-powered question-and-answer Discord Bot without coding using BotGhost. This is made possible by using OpenAI’s GPT3 models which we will use to complete the prompts or questions asked by users when they use our command.
Getting Started
If you have not already created a bot on BotGhost, follow our guide here to create your bot. If you are just getting started with APIs I highly recommend going through our first API guide here. That guide covers the basics of the request builder and URL parameters. This guide will go through the steps of creating a question-and-answer bot using OpenAI’s completion API. In the process, you should learn about POST requests, HTTP Headers, and Authorization which you can then apply to other APIs.
Finished Result
If you get stuck and simply want to see the finished result, I have uploaded the command on the marketplace here. Make sure to replace the token in the commands API request block HTTP headers with your OpenAI token.
Who is OpenAI and what is GPT3?
OpenAI is an AI research and development company responsible for developing a family of AI models with different capabilities. One of these families of models is their GPT-3 models which can both understand and generate natural language. These models can perform a wide variety of natural language tasks, from copywriting, summarization, classification, and completion. For this guide, we will be focusing on their completion API endpoint which takes a prompt and generates text to ‘complete’ that prompt. We will be creating a command that takes a question prompt and returns an answer from this completion endpoint. Before we can start using this endpoint however we must first sign up with OpenAI and generate an API key.
Signing up for OpenAI and generating an API key
To get started, head over to OpenAI and click Sign Up in the top left corner. Sign in through your google or Microsoft account or create an account with an email and password. Once you have signed in you will be redirected to the OpenAI overview page.

On this page, we can see some examples of applications and links to the playground and documentation for their APIs. To use these APIs we must first generate an API key which we will use to identify ourselves when executing requests to OpenAI’s API.
What is an API or Authorization key?
An authorization key (often referred to as an "API key") is a code passed in by a computer program to an API, to identify the calling program and to provide access to the resources associated with the key. It is a way for the server to identify the client and for the client to access the server's resources. The key is usually a string of characters that is passed in by the client with each API request and is often used to track usage and billing.
API authorization keys are typically passed to an API in the header of an HTTP request. The key is included in the header as a key-value pair, where the key is "Authorization" and the value is the actual key. In BotGhost, we use the HTTP headers menu to add headers to a request. For example, if you had an authorization key called ‘MYSECRETKEY’ you may add that as a header to your request like below:

Generating your OpenAI API Key
To generate a key with OpenAI, click the Personal dropdown in the top left of the screen and then click View API Keys in that menu.

On this new page, click Create new secret key to generate an API key. This will open up a popup with a large string of random characters. Copy this key and paste it somewhere else. After you close this popup, you will not be able to see the key again. If you for some reason forget or lose your key, you can simply delete the old one and generate a new key.
Configuring our OpenAI completion API request
We are now ready to start making our Question and Answer command. Head over to the BotGhost dashboard and create a new custom command. Give your command a name and description. I called my command ai-question-and-answer.

Save your command and head over to Discord. You should see your blank command in discord if you type / and your commands name.

Tab back into the builder and drag or click on a Send an API Request block and connect it to your root block in your command.

Give your request a descriptive name. This is the name that will be used as a variable to reference the value returned by the API request block. I called my request ‘request’. Once you are done your command should look something like this.

Setting our Authorization Header
Next, click the Request Builder button to open up the request builder. We now need to consult the OpenAI documentation to see what options and data we need to provide for our HTTP request. If we head over to the OpenAI Authorization API documentation it tells us we need to provide an Authorization header to make requests.

In the BotGhost request builder, we add headers by adding key-value pairs in the HTTP Headers section. Add a header with the Key Authorization and a value of Bearer YOUR_API_KEY replacing YOUR_API_KEY with the key you generated from OpenAI earlier.
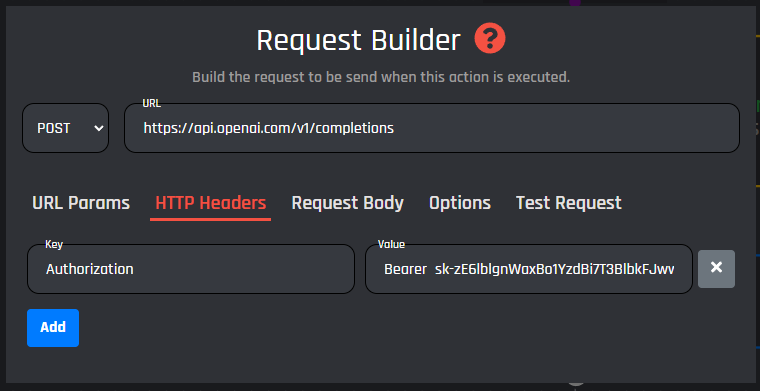
Setting the URL
Next, we need to figure out the actual URL of the endpoint we are trying to make a request to. On the OpenAI API documentation page, head over to the Completions page. This page tells us all the information we need to provide in the body of our request along with the actual URL and HTTP method we need to use.

In our request builder, set the HTTP method to POST and copy-paste the https://api.openai.com/v1/completions URL in the URL field.

The API documentation also tells us we need to provide a bunch of key-value pairs in the request body. These consist of the model we want to use as well as the prompt and some general settings for the API.
Setting our Request Body
In an HTTP request, the request body is the data sent by the client to the server in the message body of the request. It is used to send additional information to the server, such as data for a POST or PUT request. The format of the request body can be anything, including text, JSON, XML, or binary data. The Content-Type header in the request typically specifies the format of the request body.
In BotGhost, we add request body data in the Request Body section in the request builder. Go to the request builder and add two key-value pairs:
- model - this is the Id of the GPT model we are using. For this command, we are going to use the text-davinci-003. Enter a key of model and a value of text-davinci-003.
- prompt- this is the actual prompt we want the completion API endpoint to complete for us. For now, enter a key of prompt and a value of What is 1+1?.
- max_tokens - This is the maximum amount of ‘tokens’ we want each request to use. These correlate to the maximum response length of the completion request. Enter a key of max_tokens and a value of 4000.
If you want you can add the other optional key-value pairs. These are used to tweak the output of the AI and how ‘risky’ it is with its responses. For this simple command, we are happy with the default settings. Your request should now look something like this.

Testing our request
We should now actually test our request to ensure that we have entered all the information correctly. Click on the Test Request tab to open the request tester. On this tab click the Test Request button and if successful you should see the success status code 200 in the response body. If you open up the choices array in the response you will also see the response for our prompt, which should be something like 1+1 = 2.

If you remember from the previous guide, to get the variable required to access a certain bit of information in our API response, we can click that piece of information to get its variable. If you click the “1+1=2” text in the response you should get a variable such as {request.response.choices.0.text}. This is the dot notation required to get the first choice in the choices array in the API response.
We now need to actually enter a prompt that will return the answer to a question asked by the user. To do this, we will test a few different prompts in the OpenAI playground.
Creating our prompt in the Open AI playground
When using and interacting with AIs it's best to create and iterate on different prompts. AI models that generate content operate best with prompts that give the most context and information on what it is you are asking it to generate. By iterating on our prompt we can have greater control over what the AI generates for our question-and-answer bot.
To easily test different prompts we can use the OpenAI playground which simulates API requests to their endpoints for us. Head over to the OpenAI playground and enter a prompt for the API to complete for us and hit Submit.

By simply entering our prompt we can get back a basic response, in my case just ‘Canberra’. However, as we are trying to make a super smart AI question-and-answer bot we should provide a bit more context to the model so that we get more detailed answers. Instead of just asking a question, before the prompt write something such as:
You are a question-and-answer bot. Answer the following question or prompt in detail. Your answer should be a few sentences in length.
Capital of Australia
You should now get a more detailed answer.

This prompt works much better and gives us a much more detailed answer. Feel free to mess around with prompts and context for the model. Make sure that the AI does not generate something too large as that may go over the content limit on Discord.
Using our detailed prompt in our command
Now that we have a good prompt that should work for any question, we can implement this prompt in our question-and-answer command. Head back over to the command builder and click out of the request builder if you still have it open. Drag or click on a Text Option to add it to your command. Text options allow us to get input from the user who used our command. Give the text option a name and description and set it as required by clicking the toggle. Your option should look something like this.

We will use the {option_question} variable to access the question that our users input when they use our command.
Changing our prompt and using our user's question
Next click back on your Send an API Request block and open up the request builder. Go to the Request Body tab where you entered your prompt key-value pair. Change your prompt to
You are a question-and-answer bot. Answer the following question or prompt in detail. Your answer should be a few sentences in length.
{option_question}
The variable {option_question} will be replaced with the question your user entered. We now need to actually display the result of the AI completion request to our user.
Displaying our answer to the user
To get the value returned by our API response we need to use the variable from earlier which was our request name with some dot notation. Because I named my request ‘request’ the variable for the result for my command is {request.response.choices.0.text}. If you named your request something else, you can either click the result value in the Test Request response or simply replace ‘request’ in {request.response.choices.0.text} with the name of your request.
Click out of the Request Builder and click or drag a Plain Text Reply into your command tree and link it to your Send an API Request block.

Click on the Plain Text reply and enter your response variable in the content text area. Your command should now look something like this.

Save your command, wait a moment for your command to update, and head over to Discord. Run your command and give your AI bot a question. You should after a few seconds receive a response!

Congrats on creating your AI-powered question-and-answer bot. If you want to go further, I would recommend using comparison conditions to check if the API request was successful by ensuring that the status code is 200. OpenAI also has a number of other endpoints including Image creation which also may be interesting to implement in Discord.
![How to Create a Basic Calculator Command with BotGhost [API Guide #1]](https://api-prod.usenotioncms.com/v1/proxy-2/block/994966db-1e67-4170-9f2c-c754b9c2e591%2F134e7615-2cb6-49ae-be90-9c65baa92c99%2FUntitled2_5.png)
![How To Make A Discord Bot Without Coding [2022]](https://api-prod.usenotioncms.com/v1/proxy-2/block/f582eb8c-492a-42f8-af64-9107aa448126%2F7e828011-4db4-4b1c-8bb4-1b3758a7ea34%2Fmaxresdefault-1-1024x576.jpg)
